

After logging in for the first time, confirm our terms and conditions and privacy policy. All users who have received their programme access via an invitation from the account owner can skip the following point ‘Initial setup wizard’.
1.1 Initial Setup Wizard
The Wizard opens for the account-admin-user for the setup of most important master-data: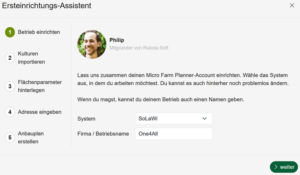
(The wizard can be opened and edited again later under Administration/Setup Wizard).
The ‘Philip’ initial setup wizard is used to quickly set up your new account in five steps.
Step 1: Enter the company name and select the company system:
Info on the system options: The programme performs the calculations for cultivation planning differently depending on whether and how the farm markets.
CSA: There is a fixed purchase of quantities. The quantities should be calculated according to membership shares/subscriptions.
Market Garden: There is no fixed purchase of quantities. The quantities are to be calculated as total quantities per crop according to the farm’s own assessment. Cultivation and planting distances are adapted to smaller technology (Market Garden standard dimensions).
Commercial vegetable operation: There is no fixed purchase of quantities. The quantities should be calculated as total quantities per crop according to your own assessment. Cultivation and planting distances are adapted to field vegetable technology (track widths of field tractors…).
Step 2: Import crops – Import data records of the 45 most common vegetable crops:
Activate import option (imports cultivation distances for system selected in step 1)
Step 3: Store area parameters: Define operational standard dimensions for bed width, length and
and path width to enable additional standardised calculations.
Step 4: Enter address data: Enter your address so that the map and weather data can be displayed on the
dashboard can be displayed appropriately (allow browser location data access!).
Step 5: Create crop plan: Click on ‘Next’ at the bottom, the initial setup dialogue closes. The cropcalendar appears with the ‘Create sets’ sidebar open (right).
Plan plantings (= sets) of a crop for the season:
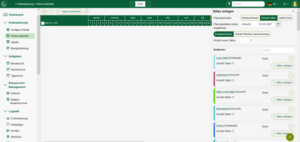
The view can be opened by selecting ‘Crop calendar’ in the main menu on the left and then ‘Create sets’ via the + button at the bottom right.
Define the number of new sets at the top of the ‘Create sets’ sidebar and, if there are several sets, the number of weeks between the harvest periods. With ‘Continuous harvest’, the harvest of the next set begins the week after the end of the harvest of the previous set. If ‘Number of weeks between’ is selected, the desired number of weeks must be entered.
Now drag and drop a crop from the sidebar on the right to the calendar week in which cultivation is to start.
To change or delete the plantings, click on ‘…Bulk processing’ at the top.
Then tick the box on the left to select which sets you want to edit.
1.2 Further set-up steps
Depending on the farm structure, the preparation for planning the scope of cultivation varies – quantity approach vs. area approach:
In the case of Subscription-Box or CSA (Community Supported Agriculture), there is usually a fixed amount of cultivation per week, which is then planned for the operational areas.
On farms that produce for the wholesale trade, for example, as many of the most economically viable crops as possible are grown on the available acreage.
It depends on the sales structure of the farm which operating system is selected and which data must be stored.
Set size (cultivation quantity) – Calculate automatically vs. define manually:
The required number of plants, bed metres or area of the sets can be calculated automatically if all the necessary data has been put in and created.
Alternatively, the set size can be entered manually. The number of plants or bed metres is entered in the planned planting set and defines the set size.
Create shares (for farms with CSA operating system selected)
The set size is calculated on the basis of the stored member shares/subscriptions (e.g. 50 shares = 50 cauliflower plants). Therefore, create shares first, even if the number of members has not yet been finalised. This makes it possible to estimate the cultivation dimensions (need for cultivation/cultivation area, young plants/seeds and other resources and harvest quantities (crates, storage area, etc.)).
For all farm types:
- Adapt master data to operating conditions: Before the entire cultivation plan is created, first adjust the master data for the crops. This data is transferred to the crop sets when they are created, so it is less necessary to edit the individual sets afterwards.
- Create fields first: The sets can then be planned and created on the areas (fields, plots, beds) in just one step using drag & drop (instead of planning the sets created in the crop calendar on the areas in a second step).
Further set-up steps can optionally be carried out independently of the cultivation plan:
- Staff planning and tasks
- Time recording – Set up public holidays
- Logistics: Enter items in the warehouse (e.g. for planned connection with webshop or distribution of purchased items in orders)
- Create customer file (+ pick-up locations and share types/subscriptions for Solawi or subscription box operation)
The cultivation planning should be finalised for these optional planning steps:
- Determination of seeds and transplants requirements
- Determine substrate requirements for nursery
- Determine the number of planters (multipots, trays)
- Harvest recording
- Create Articles in article storage
- Orders