

The chapter contains a description of the dashboard view, the most important navigation elements of the programme and the settings areas in the sections:
2.1 Dashboard and navigation
Dashboard
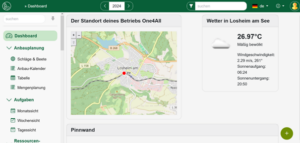
The start screen after logging in is the dashboard. It shows the operating location and local weather data. You can create and delete notes on the pinboard at the bottom.
Below the pinboard, you can customize your favorite app sections. Just click on the pencil icon (upper right corner) and select the sections, you need the most.

Open the dashboard at any time by clicking on the Micro-Farm-Planner logo (top left) or the top menu item in the main menu.
Navigation
The programme is controlled via three important elements:
Navigation bar (top)
Main menu (left)
+ button on a light green background (bottom right)
![]()
The navigation bar at the top of the screen shows the following elements from left to right:
- Display of the current programme area (here >>Dashboard)
- Year switch (selection of the planned year, applies to all programme areas)
- Filter and search field (search/display of desired content)
- Language selection (German, English, French, Italian, Spanish)
- Info menu (help and information about the programme)
- User/programme settings, change password/email address, logout button
The main menu on the left-hand side of the screen is used to call up and switch between all programme areas that need to be used frequently.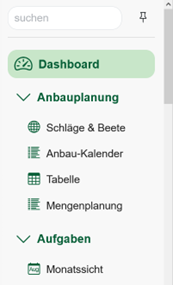
Search field and pin (section at the top):
- Search field (enter the beginning of a word and search for menu items)
- Always show or hide (click on pin symbol top right)/show menu (hold mouse over menu edge on left edge of screen)
Menu items – upper categories (green font, can be folded in/out) and sub-items
- Click to call up area (active area is highlighted in green)
- Expand/collapse top categories (click to hide/display sub-items)
+ button (bottom right)
The Create, Plan and Edit dialogues of the app areas are opened with the plus button.
To do this, hold the mouse pointer over the button, then move it up to the desired option and click on the selection. Depending on the area, one or more different options can be selected with the button. In the example image, four options (Plot, Field, Create sets and Plan sets on beds) can be selected in the Crop planning/fields and beds area.
2.2 Operating Settings
In the main menu, section „Farm“ contains the two points:
- Farm Data
- Area parameters
Farm Data: The account management data is divided into three cards
- Farm data: Name of the user environment (repository) and selected cultivation system (Commercial vegetable operation, Market Garden, CSA), option “Renumber planting sets”
- Customer data: Customer ID-Number, contact and company data stored during login/registration
- Contract: Currently booked subscription (when trial customer: Button for fee-based booking), SEPA Direct debit mandate: Download form for issuing a direct debit authorisation (displayed if a subscription is booked)
Area parameters: The following options can be found in area parameters:
- Bed settings: Operational standard dimensions for bed width, length and path width
- Multi-pot plates: Create the default values for used planters and multi-pot plates
2.3 User Settings
My Data (User settings (Menu in the upper right corner))
A picture can be uploaded by clicking on the yellow figure with the question mark. Below the picture is the user’s e-mail address. Below this, the password can be changed (recommended after first login!)
Settings:
Use/display of the conversion in weight & statistics in the harvest recording, e-mail
Switch on/off notifications (newsletter and information about the crop planner)
Always show video instructions
Change access data:
Password: Enter your old password and enter a new one. Confirm the new password and click on ‘Change’.
Email address: Enter the desired new email address and click on ‘change’. Please note: The change always affects the access data of the user currently logged into the programme (email address displayed under the portrait).
API-Keys (Feature from 35€/mon):
Open the API key table by clicking on API keys. Then click ‘+ Create new API key’ at the bottom right to create a key for the interfaces used (e.g. connection of electronic scales for crop harvest recording).
Backup and Recovery (feature from 35€/mon):
This function is intended to back up the storage status on our server on a daily basis. In the backup table, the storage statuses of the entire account data record of the past 7 days are offered for recovery. If you want to load a backup, click on the entry and confirm the subsequent prompt.
Please note: A restore overwrites the entire repository. All changes made after the restored backup will be lost!
2.4 Administration
Users without admin rights can skip the following.
User roles and rights management (optional module from €35/month): Standard roles (admin, consultant, employee and temporary job) with predefined rights are stored under Roles and rights. Additional, user-defined roles can be created and their rights for Micro Farm Planner use can be defined. These roles can be assigned to team members or an advisor with their own programme access (see in chapter 5 Team and time registration).
Standard roles – Predefined roles (admin, employee, consultant, temporary job):
Admin (may use, change and delete everything), Consultant (may only display everything), Employee (may use most areas, but may not delete anything or export data), Temporary help (may only display areas relevant to production, use own tasks and time recording). Click on the line of the role to open the rights submenu. The settings for the default role can be viewed here, but not changed. To change the rights of a role, click on the copy icon to the right of the standard role and edit the rights of the copy. Then assign this new role to employees in the Personnel area.
User-defined roles:
Create your own user role: Click on ‘+Add role’ at the bottom right of the roles and rights area. A new role has been created. Change the name by clicking on it and then click outside the name field to save. Now click on the respective programme area to display the authorisation options. If you activate an option, the corresponding authorisation is assigned to this role.
Order processing: Click here to create your order processing contract with Rukola Soft as a PDF. This is only required once and serves as mutual legal protection.