

The personnel and time recording area comprises the following sections:
- Team (list of the company’s employees and their master data)
- Annual summary table
- Time registration (editable time table for the person currently logged in) and Weekly work schedule (overview of the working times of all employees in the current week)
- Time registration manager (overview/check (record) of recorded staff times) and public holidays (create for the company – automatically for German federal states, otherwise manually) for consideration in time recording and weekly work schedule
- Annual overview – Manager
- Public holidays (customize holidays for your time-recording calendar)
5.1 Team
Team-Management
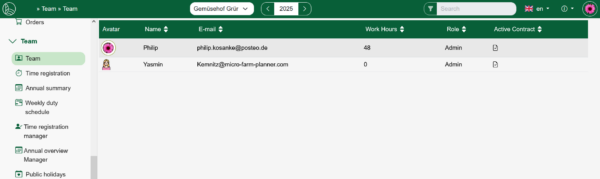
The team-table includes all created co-workers. A list entry shows the employee’s avatar or photo, name and (if stored) email address on the left. The weekly working hours and the user role are shown on the right. In the column “active contract” an icon shows up, if an active contract exists. If no contract is active (because it has been cancelled or is not yet valid because the creation date is in the future), no icon is displayed. The sort arrows in the column can be used to sort by active/inactive employees.
Clicking on an entry (anywhere in the row) opens the sidebar on the right with the personal data for editing.
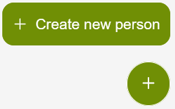 Create new team-member: Click “+ Create new person” at the bottom right. The entry appears in the table and the sidebar for the new entry opens. Enter the co-worker´s name and assign a suitable avatar. The employee’s role (definition of user-rights in the program) cannot be set, until the invitation is accepted (see description below).
Create access – Invite person: Enter the email address of the employee. By confirming the entry (click on letter-button), you will send an invitation email. This contains a confirmation link. The invited person activates their personal access by clicking on the link (check spam folder if necessary; no mail found? Enter the e-mail address in the login window on our website micro-farm-planner.com and click on “Resend activation link” below).
Next put in the initial information and create an active contract.
Initial employee settings for working time recording:
If the start date of use in the programme does not correspond to the employee’s start date (as they have already worked in the company before), the ACTUAL status for leave and working hours can be entered under ‘Initial creation information’.
Create contract: Create a new contract by clicking on ‘+ Create contract’ at the bottom right (sidebar of the employee must be opened!).
Terminate contract: 
By clicking terminate contract the active contract is set to inactive with the given date.
The data of the contract are fixed in a new section “previous contracts” at the sidebar-bottom. The Start and End-Date is shown in the overview, click on the row, to get the contract details.
Current contract:
Setup the holidays per year and set the startdate.
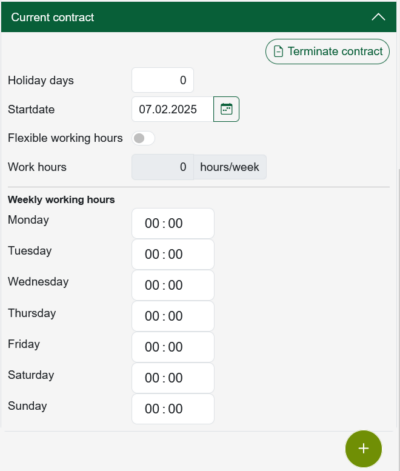
Below this, select the number of working hours for every weekday, to set the weekly working hours. The information is then transferred to the time recording for this person.
Weekdays with zero working hours are displayed in the time recording table as day type ‘Day off’. Day type ‘Working day’ is selected for all days with working hours.
The weekly working hours can now be recorded in the time recording system, taking into account the planned working hours of the weekdays (e.g. Monday=8h, Thursday=6h) and an automatic target/actual comparison can be calculated.
Flexible working hours: 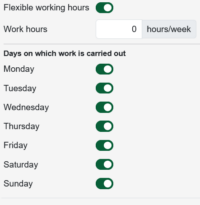 If the hours of an employee’s weekdays are not constant, the “Flexible working hours” option can be activated instead of specifying fixed hours. An agreed number of working hours per week has to be entered. The recorded times are then calculated in time recording from the number of selected days (one day = 1/7 of the hours per week).
5.2 Time Registration
Time recording can be used for all registered employees (menu item “Employees”) to digitally record their attendance times. The times recorded via the mobile app can also be corrected here. You must have your own access to the program (see above under Personnel – Create access – Invite person).
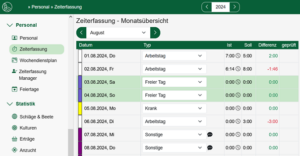
The time recording table shows the working hours of the employee currently logged in. A month can be selected using the drop-down menu or the arrow buttons.
Entries, corrections or deletions of working times are made via the “Actual” column.

Record times:
Click on the clock symbol, in the sidebar that now opens click on “+” (to the left of “Check in”) and enter the daily working time under “Check in” and “Check out”.  If a break is to be taken into account, click on the “+” again and enter the additional working time after the break (half an hour break is automatically taken into account, please adjust if the break time is different). Entries entered via the mobile app are also displayed in the table and can be changed if necessary. To delete an entry, click on the trash can icon.
All entries/edits for the day are logged under “Log last changes”.
Select day type – The day type (vacation, sick day, floating day or day off) can be set in the drop-down menu in the “Type” column. On the left, a colored bar distinguishes non-working days or weekends, vacation or illness from normal working days (white).
The number of vacation days and weekly working hours stored in the employee’s master data (see Personnel/Employee settings for time recording) are displayed, as are public holidays.
If days of a type are to be set for a continuous period (e.g. 2 weeks of vacation), select “+ Enter absence” at the bottom right.
Then set the type and select the period. If required, a reason for absence can be entered in the comment field. The comment is then displayed in the time recording and in the duty roster.

Weekly work schedule: The schedule shows the stored weekly hours and the working days selected in the time recording for each active employee for the selected calendar week. The colors of the day types are explained at the top right under “Legend”.
Each day has two columns. On the left is the day type (working day, vacation day, sick day, floating day or day off) and on the right the planned working hours for the day. Changes to the day type can be made directly in the weekly calendar (click on the day and select the type). If an asterisk is displayed next to a day type, a comment has been added. Hold the mouse pointer over it to display it.
By clicking on “Export”, the selected week is exported as an Excel file and can be saved or printed. Alternatively, a print-optimized black and white version of the duty roster can be printed.
5.3 Time Registration Manager
Here, any user with activated rights for the time recording manager (see menu item Roles and rights) can view the time recording of all registered employees.
Employees without authorization can skip this section.
To view the working hours and absences, select the name of the desired employee in the drop-down list. Then select the month to be displayed or the annual overview in the drop-down menu of the month switcher.
Admins or other roles with write access can enter absences in the same way as employees, as already described in the Time recording section. If days of a type are to be set for a continuous period (e.g. 2 weeks’ vacation), click “+ Enter absence” at the bottom right.
Changes to recorded working times are logged and can be viewed in the overview. If there are time overlaps and conflicts between entered working times, these are highlighted in color. Working days set to checked by an admin are blocked for reworking:

Public holidays
Public holidays can be imported for every federal state in Germany. User-defined public holidays can be created by clicking on the “plus” symbol. Public holidays created here are then taken into account in the time recording. In addition to public holidays, any other public holidays can be defined. On these days, a target working time of zero is displayed in the time recording for all employees. Half public holidays are shown as 50 percent under “Time off”.